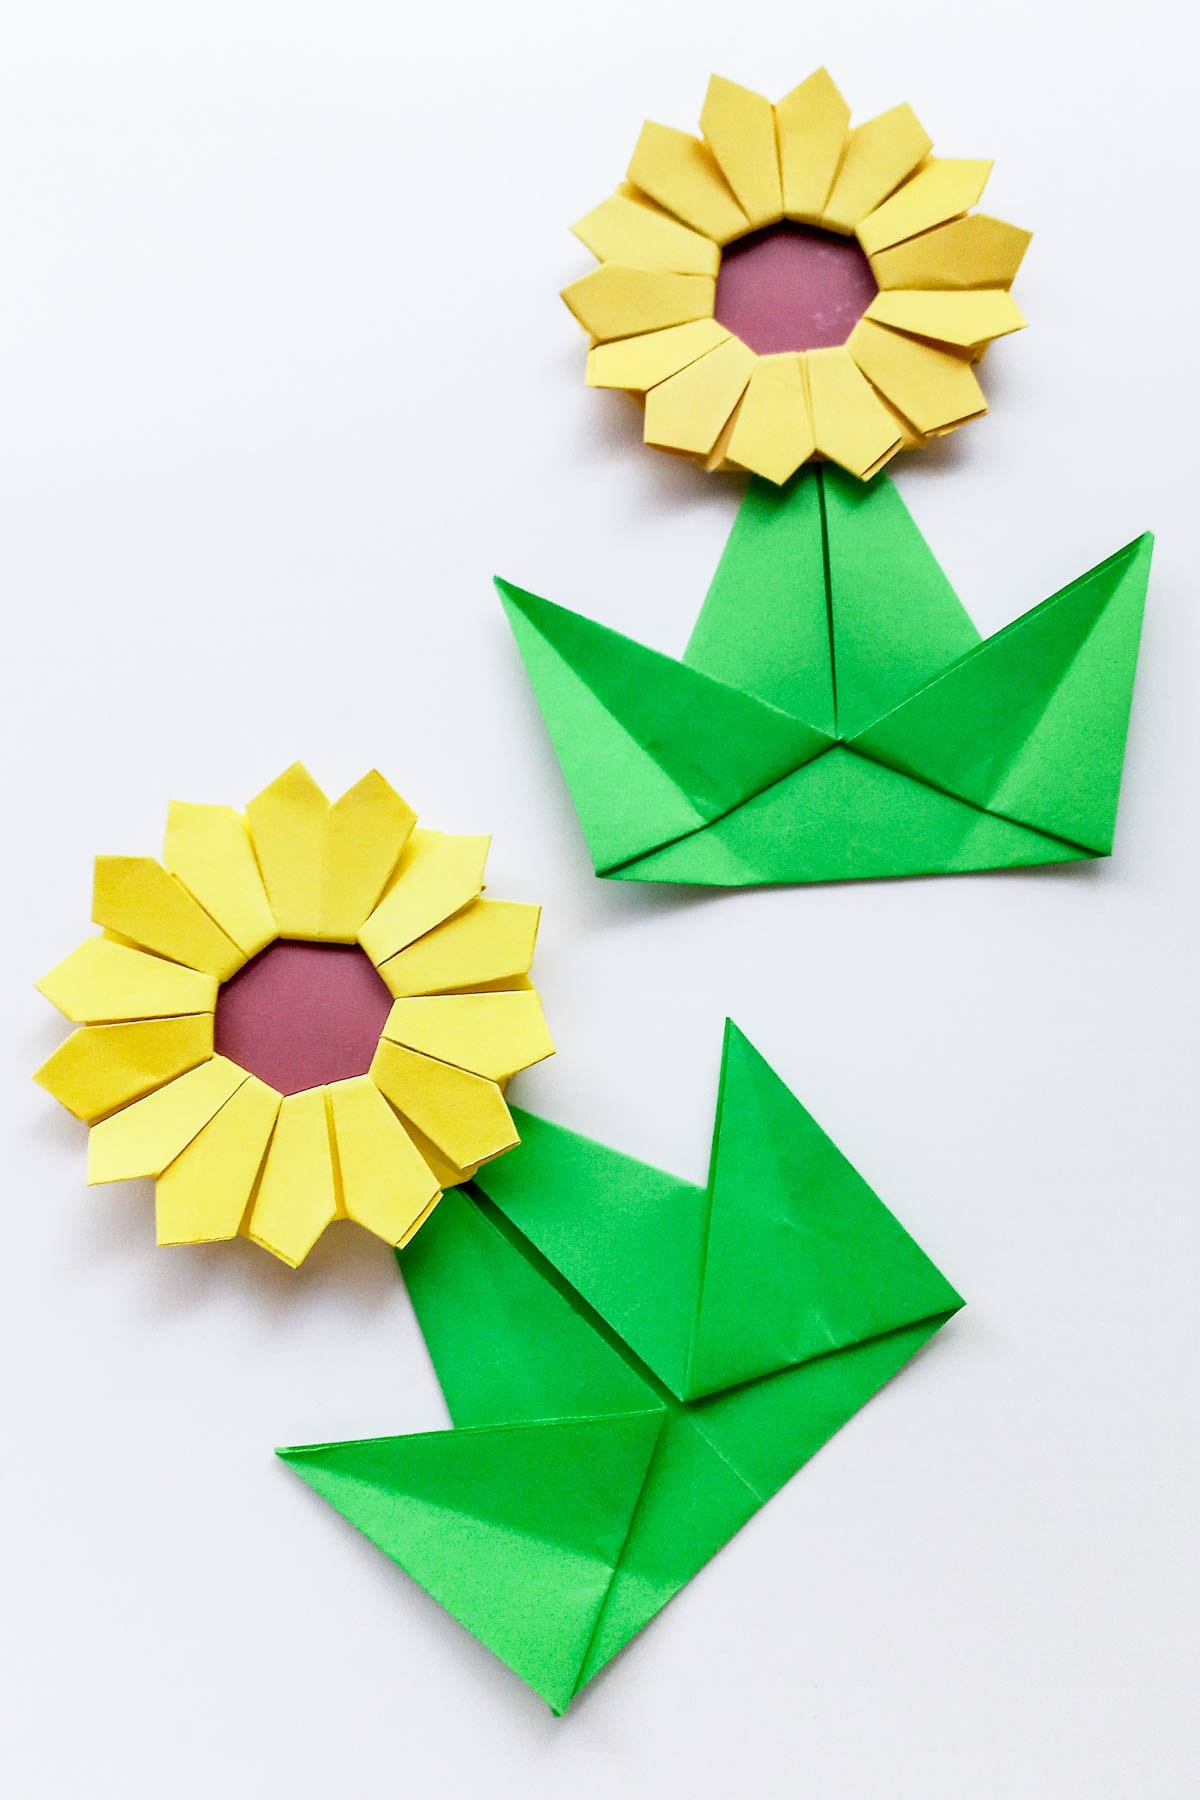
Easy Origami Sunflower (Step by Step Tutorial)
This origami sunflower craft is a beautiful and intricate paper folding project perfect for kids and adults who love origami! With its layered petals, structured folds, and a striking center, this paper sunflower makes a stunning decoration or handmade gift. This craft requires precision and patience, but the result is well worth it!
Follow along with the detailed step-by-step instructions below to create a gorgeous sunflower entirely out of folded paper. Whether you’re making it for spring, summer, or just for fun, this paper flower craft is a rewarding challenge for origami lovers.
If you love making more paper flower crafts, we have plenty of beautiful and creative projects to try! For another bright and cheerful sunflower craft, check out our Popsicle Stick Sunflower Craft—a fun and simple way to create a sunflower using paper and a popsicle stick for the stem. If you’re looking for an easy printable option, our Printable Sunflower Craft Template makes crafting a sunflower effortless with a ready-to-use design!
Table of Contents
Why You’ll Love This Craft
🌻 A true origami challenge! Great for improving paper folding skills.
✋ Fine motor skill booster! Helps with precision and dexterity.
🎨 Customizable! Experiment with different colors for a unique look.
📄 No cutting required for the petals! Just fold and assemble.
Materials Needed
- Colored craft paper or origami paper – Yellow (or any petal color), brown for the center, and green for the stem and leaves.
- Ruler and pencil – For measuring and cutting.
- A pair of scissors – Only needed for the center and stem.
- Craft glue – To secure the petals and center.
How to Make an Origami Sunflower
Making the Sunflower Petals
Let’s start with the petals. You’ll need seven square papers measuring 3 x 3 inches in your chosen petal color.

Take one square and fold it diagonally in half, then unfold it. Repeat this diagonal fold on the other side, then unfold again.

Flip the square to the other side and fold it vertically in half, then horizontally in half.

Unfold it again—you should now have four creases forming a grid with diagonal folds.
Next, push the vertical and horizontal creases inward while keeping the diagonal folds outward.

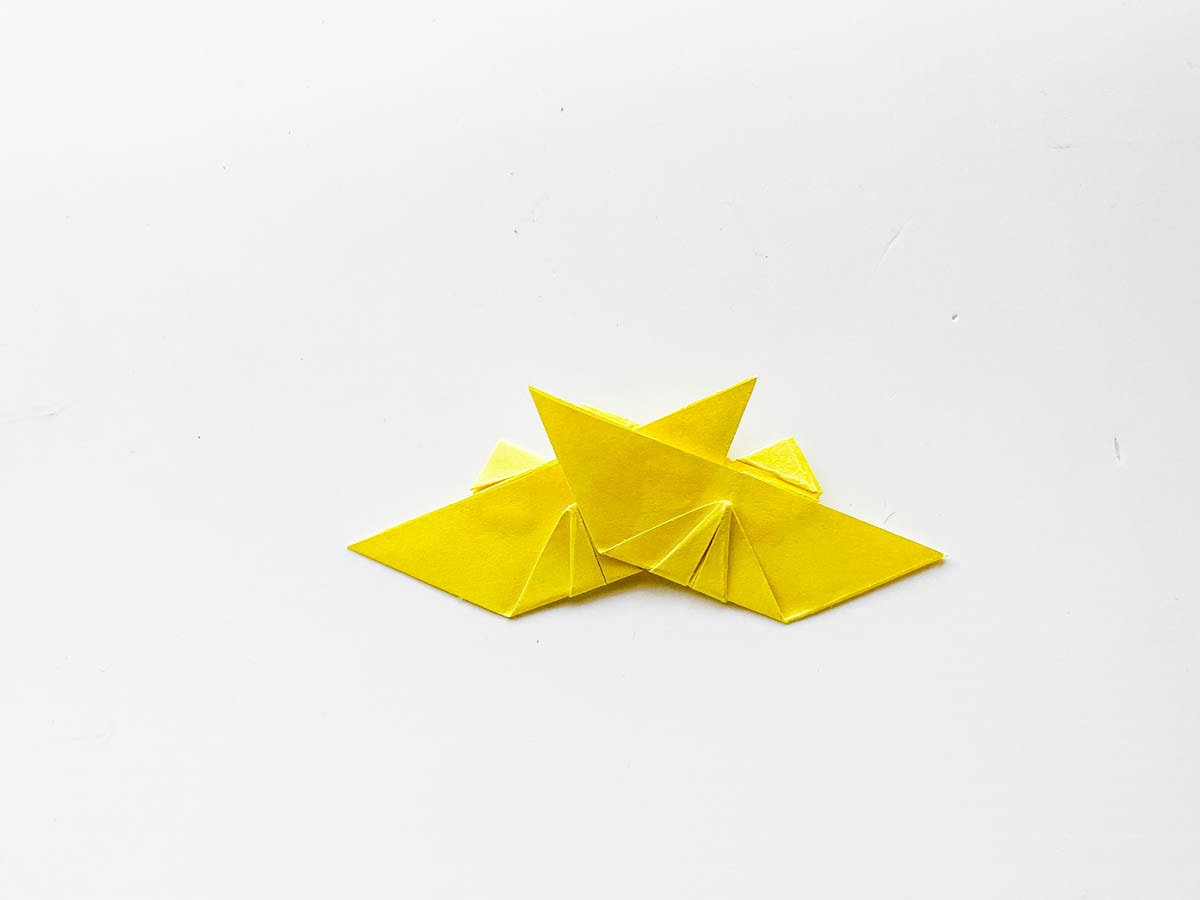
Flatten the current pattern. This will cause the paper to collapse into a triangle shape with two triangle flaps on each side. Flatten the current pattern.

Hold one open corner of a triangle flap and fold its diagonal edge to align with the middle crease.

Repeat this for the other side to create a symmetrical shape.

Now, flip the pattern to the other side.

You’ll see two small triangular tips sticking out at the top—fold each 90-degree side down, aligning it with the bottom side or the top open edge of the base triangle.

Repeat with the other triangle tip like shown below.

Fold up the bottom tip of the triangle by about 1 cm. This completes one petal of the sunflower.

Repeat this entire process to create six more petals, following the same steps.

Once all seven petals are ready, take two petals and join them side by side by inserting the extra folded edge of one petal under the flap of the other.

Push the petals together, making sure there is no gap when they lock together.

Flip the joined petals over and flatten any extra tips inward, aligning them neatly with the rest of the pattern.

Turn the pattern back over and attach the third petal, locking it in place just like before.

Continue adding petals one by one, following the same method.

Once all seven petals are connected, they will naturally form a circular flower shape.

For added security, apply a small amount of glue between the overlapping petals to hold them in place.
To create the center of the sunflower, cut out a small circle of brown paper and glue it underneath the sunflower.

Secure it to the wrong side of the origami pattern.

Making the Stem & Leaves
Cut out a green square measuring 6 x 6 inches for the stem and leaves.

Fold the square diagonally in half, then unfold.

Fold it diagonally in half again, on the opposite side, and unfold.

Next, fold the diagonal sides inward, aligning them with the middle crease to create a tapered shape.

Hold one side of the top layers and fold it outward at a 45-degree angle or less.

Repeat this on the other side to form the leaf shape.

Finally, attach the origami sunflower to the top tip of the green stem-leaf pattern, securing it with glue if needed.

Your origami sunflower is now complete!

Top Tips
✔️ Use thinner origami paper for easier folding and crisper creases.
✔️ Be precise with your folds—symmetry is key to a beautiful sunflower!
✔️ Glue the petals lightly for extra durability while keeping a clean look.
✔️ Try different petal colors like orange, red, or even pink for a creative twist!
Educational Uses
This origami sunflower craft is not just fun—it’s also a great learning tool!
Geometry & Math Skills: This craft teaches folding techniques, symmetry, and spatial awareness.
Fine Motor Development: Precise folding and aligning help improve dexterity and patience.
Science & Botany Learning: Use this craft to introduce sunflowers, their growth cycle, and their role in nature.
Art & Creativity: Kids can experiment with different color combinations and add extra details to their sunflowers!
For more stunning paper flowers, try the Paper Sunflower Craft, a layered and realistic-looking sunflower project that’s perfect for home or classroom displays.
If you love bold and tropical flowers, our Paper Heliconia Flower Craft is a unique and vibrant addition to any floral collection. And for a classic marigold design, the Paper Marigold Craft Template provides a step-by-step guide to creating these stunning flowers, great for seasonal or festive decorations.
This origami sunflower craft is a fun and rewarding challenge for kids and adults who love paper folding! Whether you’re making it for a nature lesson, a seasonal project, or just for fun, this step-by-step tutorial ensures that your origami sunflower turns out beautifully.